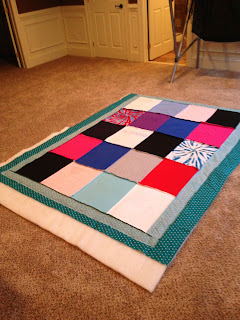
How to make a t-shirt quilt
1.
First, collect all of the t-shirts that you may
want to use. I made my quilt a 5x4, so I picked out 20 t-shirts.
2.
Second, you want to cut your t-shirts. I cut my
first t-shirt 15x15 inches, using a rotary cutter, so that I would have
straight lines. Once you have your first t-shirt cut out, all you need is a
flat table, scissors, and all of your t-shirts. You can use your first t-shirt
as a pattern for the rest. The rest of my t-shirts were not cut as well as my
first one because I am hardly the expert cutter or sewer.
3.
Third, you want to lay all of the t-shirts out
in the pattern that you are going to sew them. I did four across and five down.
4.
After you figure out what pattern you are going
to sew the shirts in, you can iron all of the shirts. I ironed them with starch
(which you can get at your local CVS), so that they would not stretch as much
when I sewed them. The edges of the t-shirts tend to curl once they have been
cut, but that is simply a nuisance.
5.
Fifth, you can start sewing your t-shirts
together! I did them in rows first, and then sewed the rows together. Any
research that I did about how to make t-shirt quilts, said that you needed
fusible interfacing, but one of the ladies (who has made many a t-shirt quilt)
said that it was unnecessary. T-shirt material tends to stretch, but it is easy
enough to sew on. Make sure you pin your t-shirts tightly to avoid the fabric
stretching a lot and making it hard to sew.
6.
Once you have all the t-shirts sewn together
it’s time to look into backing and batting. If you want to back your quilt with
fabric bought at your local fabric store, you are going to have to seam it,
since it will most likely not be wide enough for your t-shirt quilt. What I
decided to do was by a sheet that I liked for my backing. I just went to my
local Target, and got a full size sheet set, so that I would have plenty of
fabric. For batting, I just got medium weight. You can buy batting at your
local fabric store. My batting was not wide enough, so I ended up hand
stitching two pieces together to make it wide enough for my quilt.
7.
Now that you have your backing and batting, you
can start piecing the rest of the quilt together. I decided that I wanted to
have a border on my quilt, so I cut four-inch strips off of my backing fabric.
I constantly checked to make sure that my backing was big enough to cover my
quilt every time I cut off the strips of fabric. It’s better to have more than
less. I then pinned and sewed my border on. There are many websites that will
teach you how to make a border, and you can also buy a border at most fabric
stores, but I decided to make my own so that it would match the back. I cut
four strips and sewed the sides as short pieces, and the top and bottom as
long.
8.
After you have the entire front of your quilt
done, you can now start sewing all of the pieces together. Lay your batting,
backing (face up on top of the batting), and your quilt face (face down on top
of your backing) flat on the floor. Pin all of the pieces together.
9.
Now that you have all of your pieces pinned
together you can sew them all together. Sew both sides and the bottom together
straight across. The top edge of the quilt, you need to leave a 12-inch hole in
the middle of the quilt so that you can turn it. Turning a quilt it just one
way of making it. People also make quilts by making a blind/invisible hand
stitch around the whole border of the quilt. I find that turning a quilt is
easier, and makes the edge look cleaner.
10.
Once you have your whole quilt sewn together,
except for the 12-inch portion at the top, you can turn it. Reach inside the
quilt to the far corner, and gently pull the whole quilt through. Once you have
it facing the right way, be sure to pull out the corners.
11.
Now that your quilt is almost completed, you can
do an invisible stitch on that hole at the top, to have sewn completely closed.
I used this website (http://blog.makezine.com/craft/howto_hand_sew_a_blind_hem/)
to
learn how to make an invisible stitch.
12.
Now that your quilt is all sewn together,
all that is left to do is secure it, so that the batting doesn’t move. If you
want the quilted look, you can sew along all of your quilt squares, so that it
is quilted on the back as well. However, I simply chose to tie it in each of
the corners of the t-shirts in my quilt.
13. Now, you’re all done! All you have to do is wash it and snuggle up with it!


